This expert-tested Food Processor Pie Crust is foolproof and made simple using the food processor. It’s buttery, never soggy, and melts in your mouth all with just 6 ingredients. You will have perfect flaky crust results every single time!
There’s nothing like a homemade pie crust, it beats store-bought every time, in my opinion. But a pie crust from scratch can be intimidating. This is why I’m sharing my perfect dough recipe that uses the food processor for consistent results every single time.
Pies are one of my favorite desserts, but when the pastry is wet or chewy, this ruins the whole pie. After testing all different pie dough recipes, I found that using both shortening and butter yields the flakiest, light crust that can hold any delicious filling.
Now making the dough by hand is great (truly an art in the pastry world), but to make the process easier, use the food processor. This method shortens the prep time and is less risk to overworking the dough and making a tough crust.
After you try this recipe, you’ll always want to make the pie dough from scratch. Try it with my whole wheat pie crust or gluten-free pie crust as well. You won’t be disappointed.
Table of contents
Why You’ll Love this Recipe
- Tried and tested pastry. As a trained recipe developer, this recipe was developed using my recipe development method that focuses on developing the best possible recipe while also prioritizing ease and being realistic. Just like all of my recipes, this recipe was tested several times and continues to be a recipe I use for both sweet and savory recipes because it consistently turns out perfectly flaky!
- Easy to make. It’s not intimidating or hard to make! Unlike many pie crust recipes, this recipe leads with ease and uses the food processor.
- Great for doubling. This recipe can easily be double or quadrupled! It can be used for either single pie crust recipes or double pie crust recipes.
- Perfect to Make Ahead. This pie crust dough stores wonderfully in the refrigerator or freezer. Simply wrap it in plastic wrap and use it as needed. A meal prep or holiday prep dream!
- Use with any dessert recipe. Of course this crust is great for single-and double-crust pies (like my Blueberry Rhubarb Pie), but it can also be blind baked and used for pumpkin pie or no-bake custard pies. It’s also ideal for from-scratch pumpkin poptarts or hand pies.
- Uses butter and shortening. The best of both worlds! Shortening ensures a super-flaky crust while butter adds flavor.
Butter vs. Shortening
Shortening was the go-to choice of fat for pie crust in the 50s and 60s. The reason grandma loves it so much? Shortening is 100% fat, and has a high melting point, which makes it ideal for creating flaky, tender layers.
The high melting point of shortening makes it easier to work with the pie dough when rolling it out. The downfall to shortening is that it does not offer the same flavor as butter.
Butter, on the other hand, is about 80% fat and 20% water. That water content helps to create a flaky texture through evaporation during backing.
The tricky part of using only butter in a pie crust is that it has a lower melting point than shortening. If the pie crust gets too warm, it will become too soft to handle and break. If it’s too cold, it will be too hard to roll out.
My favorite type of fat to use in pie crust achieves the best of both works. I prefer a combination of shortening and butter, the result is a supremely flaky, buttery crust.
Ingredients
The best part of this pie crust recipe is it only uses 6 ingredients and you probably already have them in your kitchen.
- Unbleached all-purpose flour: I always prefer unbleached when it comes to all-purpose flour. No recommended substitutions here, if you want to use whole-wheat flour, use a whole-wheat pie crust recipe.
- Granulated sugar: you just need a dash of sugar—1 tablespoon to be exact. You can skip it if you’re using this pie crust for a savory recipe like Pot Pie.
- Kosher salt: just half a teaspoon of salt is all you need. I always use kosher salt, but you can also use table salt.
- Chilled vegetable shortening: I use vegetable shortening because it’s mild in flavor and most likely to be in your pantry.
- Chilled unsalted butter: use unsalted butter here. If you use salted butter, you risk the dough becoming a bit too salty. If you only have salted butter on hand, skip adding the ½ teaspoon of salt to the dough.
- Ice water: chilled sparkling water or vodka will also work here. Vodka will evaporate off and arguably make a slightly flakier crust. Any three will work.
Using the Food Processor for Pie Crust
When making homemade pie crust there are several methods that can be used to mix the dough. The classic way is by mixing the ingredients by hand using a pastry cutter. It’s more likely that dough will become overworked when made by hand, which is why we prefer the food processor method.
To avoid this from happening, I recommend using a food processor to make pie crust. It standardizes the process, reduces prep time, and creates the same great pie crust, every single time!
How to Make Food Processor Pie Crust
Store-bought pie crust does not compare to homemade. The following steps simplify the task of impressing your guests and can be made ahead, saving you time.
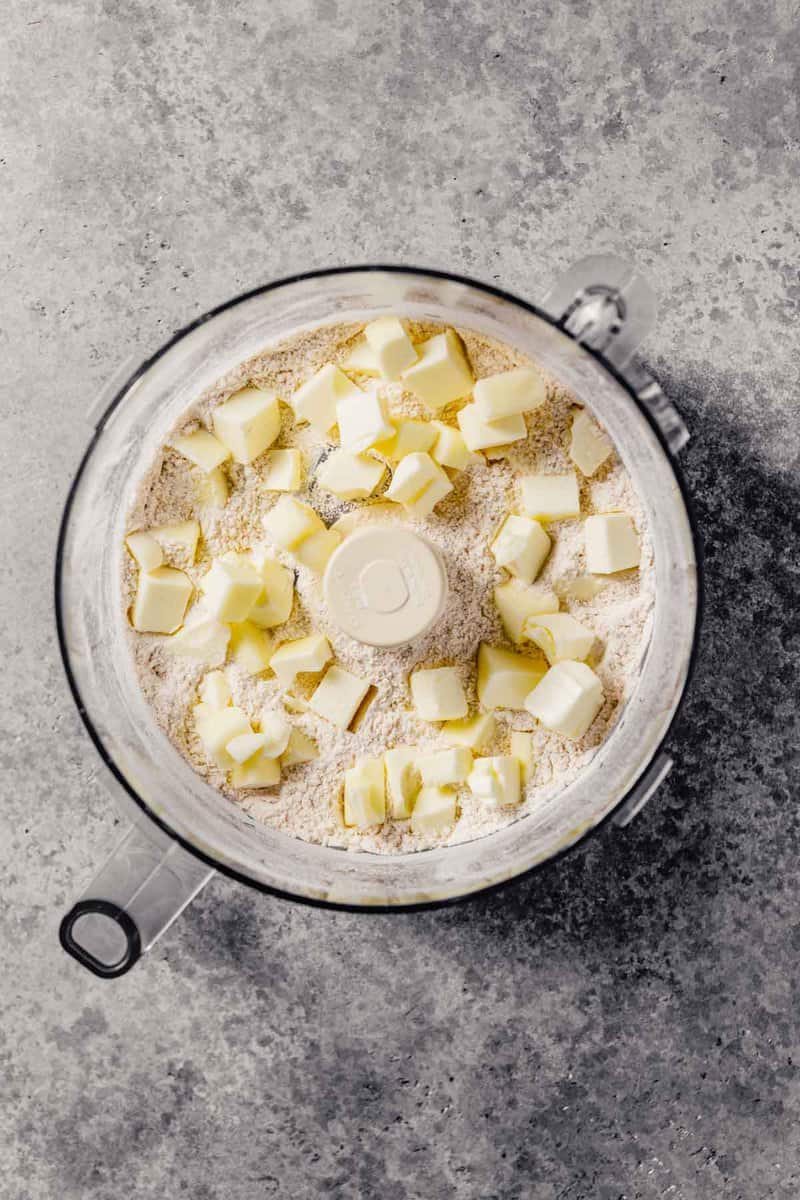
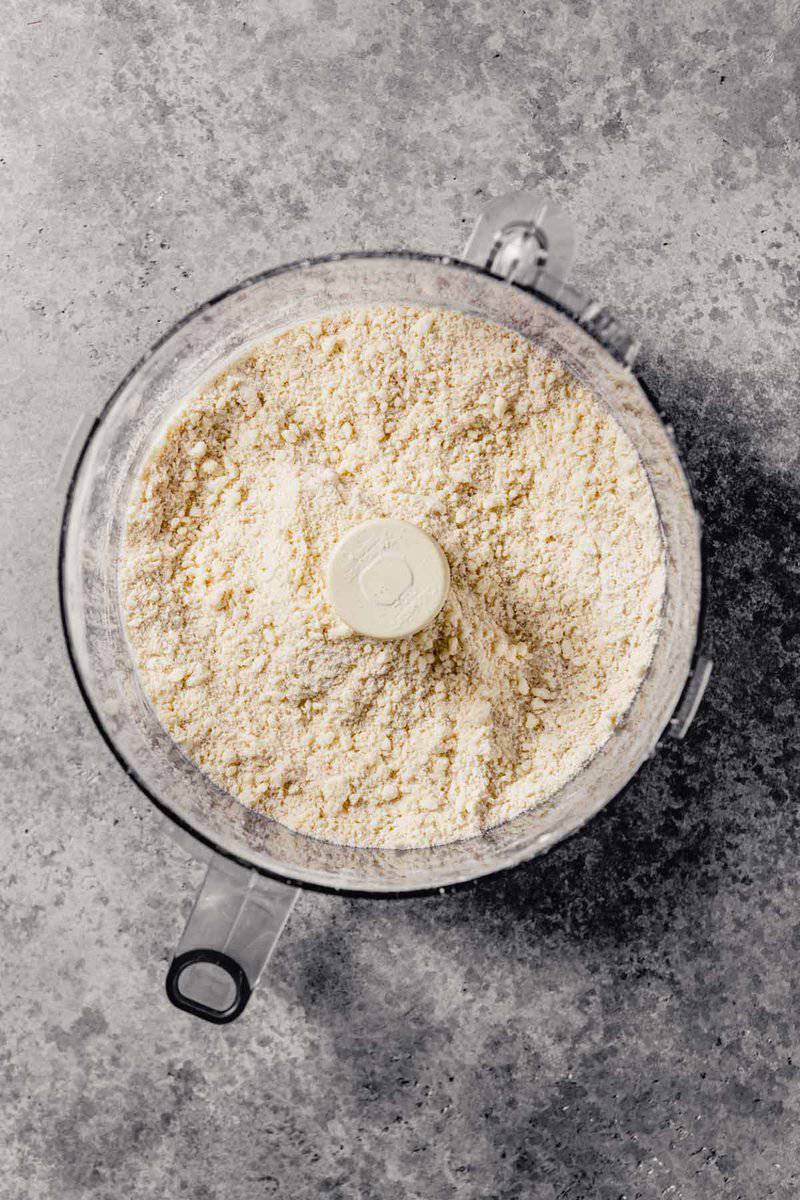
- In the bowl of a food processor, combine the flour, sugar, and salt, pulse until they are combined.
- Add the chilled shortening and pulse until combined.
- Add the chilled butter and pulse until the butter is broken into small, pea-sized pieces.
- Transfer the mixture to a large bowl and, using a spatula, add the ice water. Mix to combine just until the dough comes together. The mixture should be able to be pressed into a dough but still be fairly dry and crumbly. Small pockets of fat are also incredibly important—don’t overwork the dough.
- Press the dough into a flat disk and chill for at least 1 hour. You can also make your dough several days in advance and store it in the fridge.
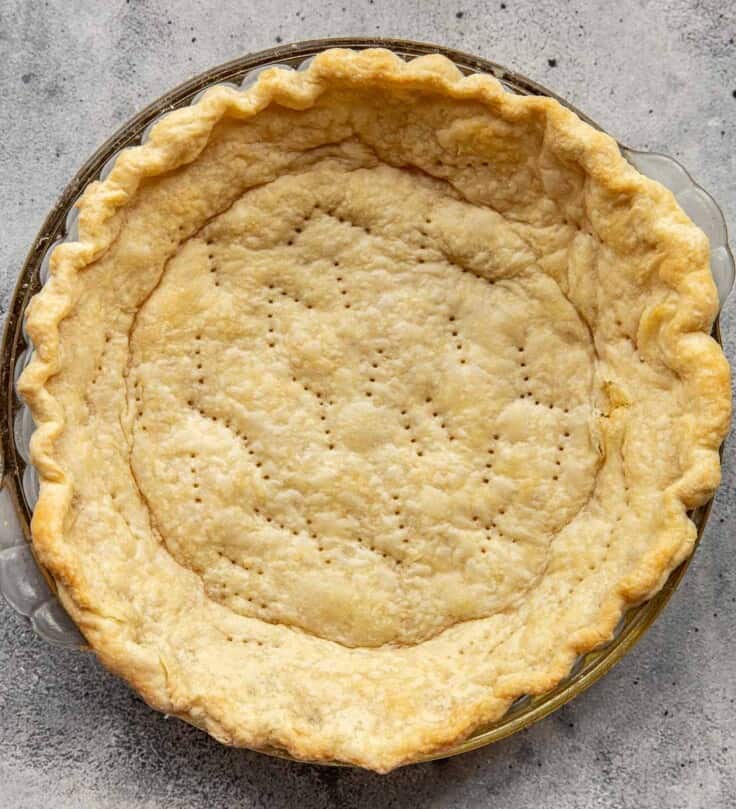
- Roll the dough out until it is about ¼-inch thick and use as desired.
Scroll down to see exact ingredient measurements in the recipe card.
Science Behind Pie Crust
The key to really good pie crust lies in the science of limiting gluten formation and creating a sort of rough “lamination.” Why limit gluten formation? It is what gives cookies and breads structure and chew. And while you want a bit of structure in your pie crust, you don’t want that much.
As for the rough “lamination,” this is all about creating layers of pastry through evenly dispersed bits of fat. The excess moisture in the butter will evaporate off during baking and leave thin air pockets which create layers.
And finally, the bit of sugar added to the dough and the milk proteins will aid in browning, creating a crisp, flaky and flavorful pie crust!
Why Temperature is Important to Flakiness
It’s incredibly important to use cold butter, cold shortening and ice cold water to make homemade pie crust. If warm butter or shortening is used, the fat will blend cohesively into the dough instead of creating a dough speckled with fat pockets.
Those fat pockets are important for creating flaky layers in the crust once baked. Similarly, that’s why it’s so important to work quickly when mixing the ingredients together and rolling out the dough. Keep the dough as cold as possible while working with it.
If the dough gets too warm while rolling it out, transfer it to a baking sheet and chill in the fridge before continuing.
Rolling Out the Dough
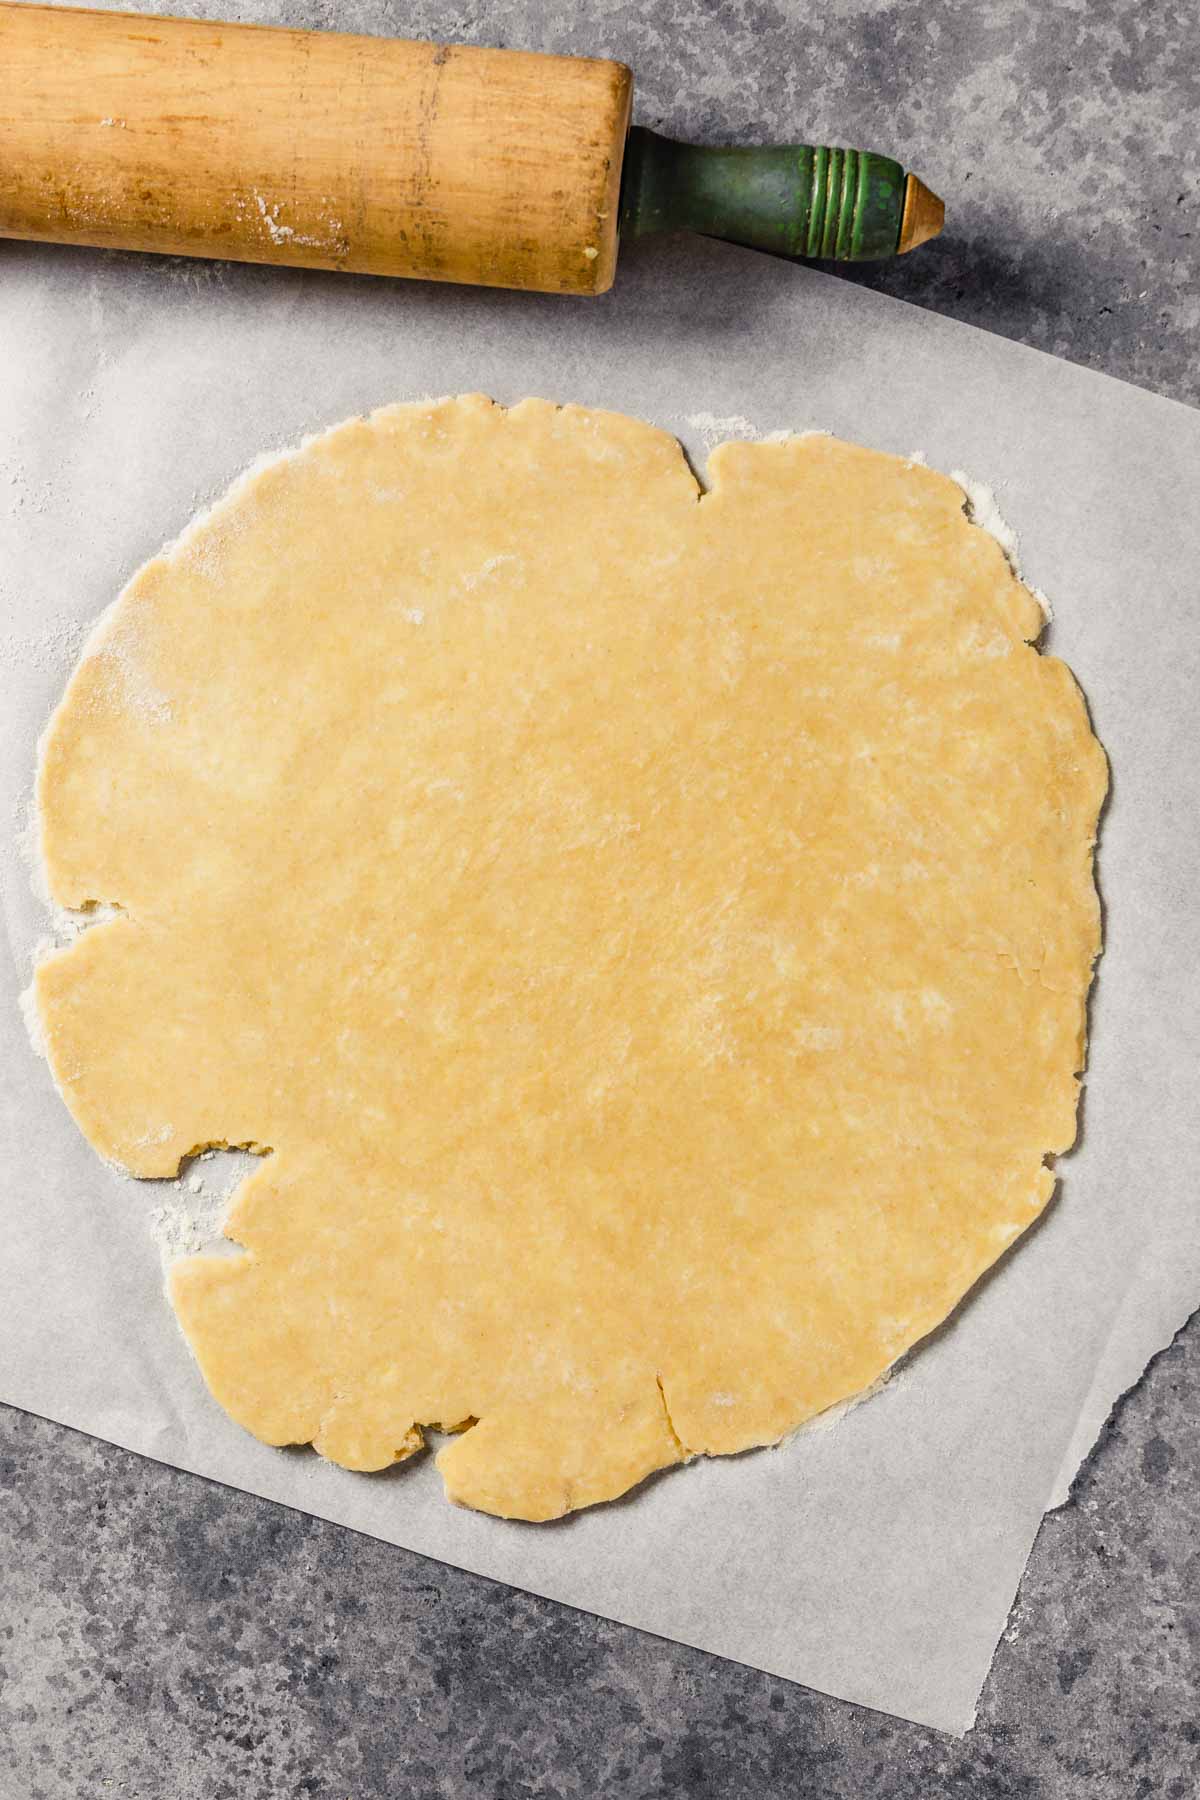
You may need to let the dough sit at room temperature for 5–10 minutes before rolling out. When you’re ready to roll, lightly dust the counter with flour then lightly dust the top of the dough with flour.
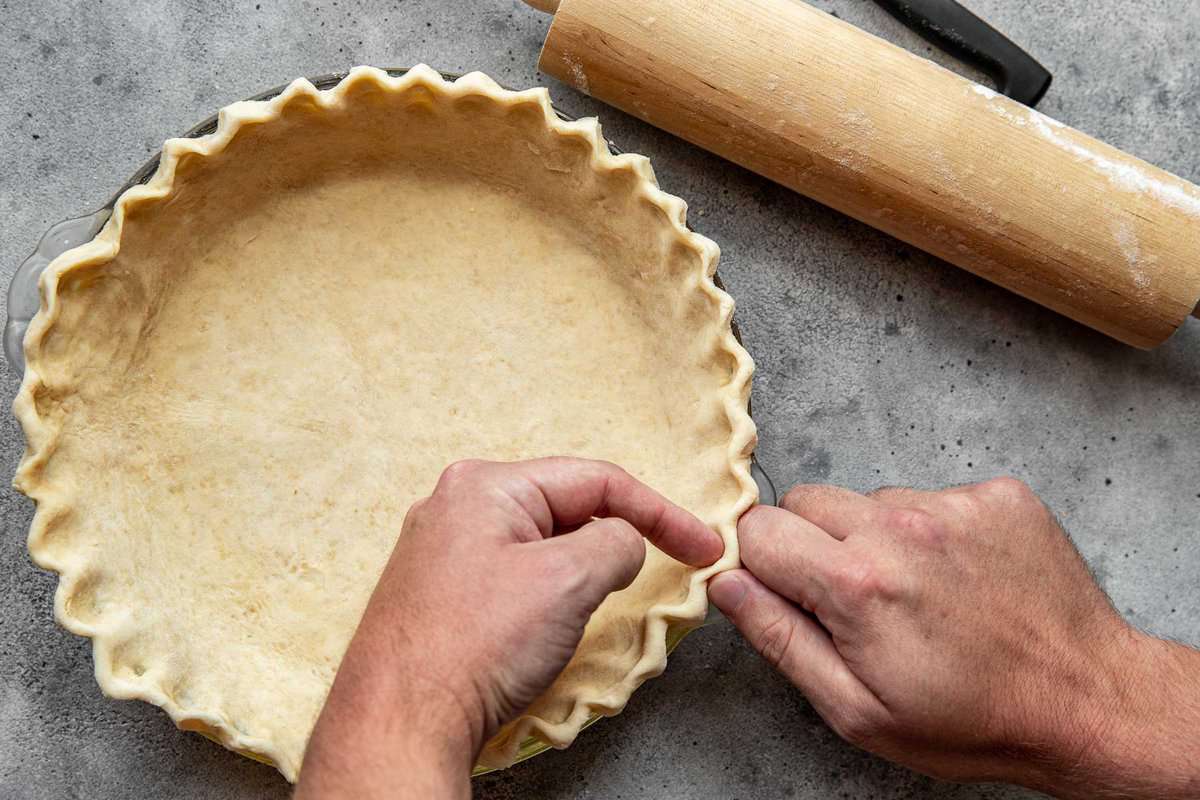
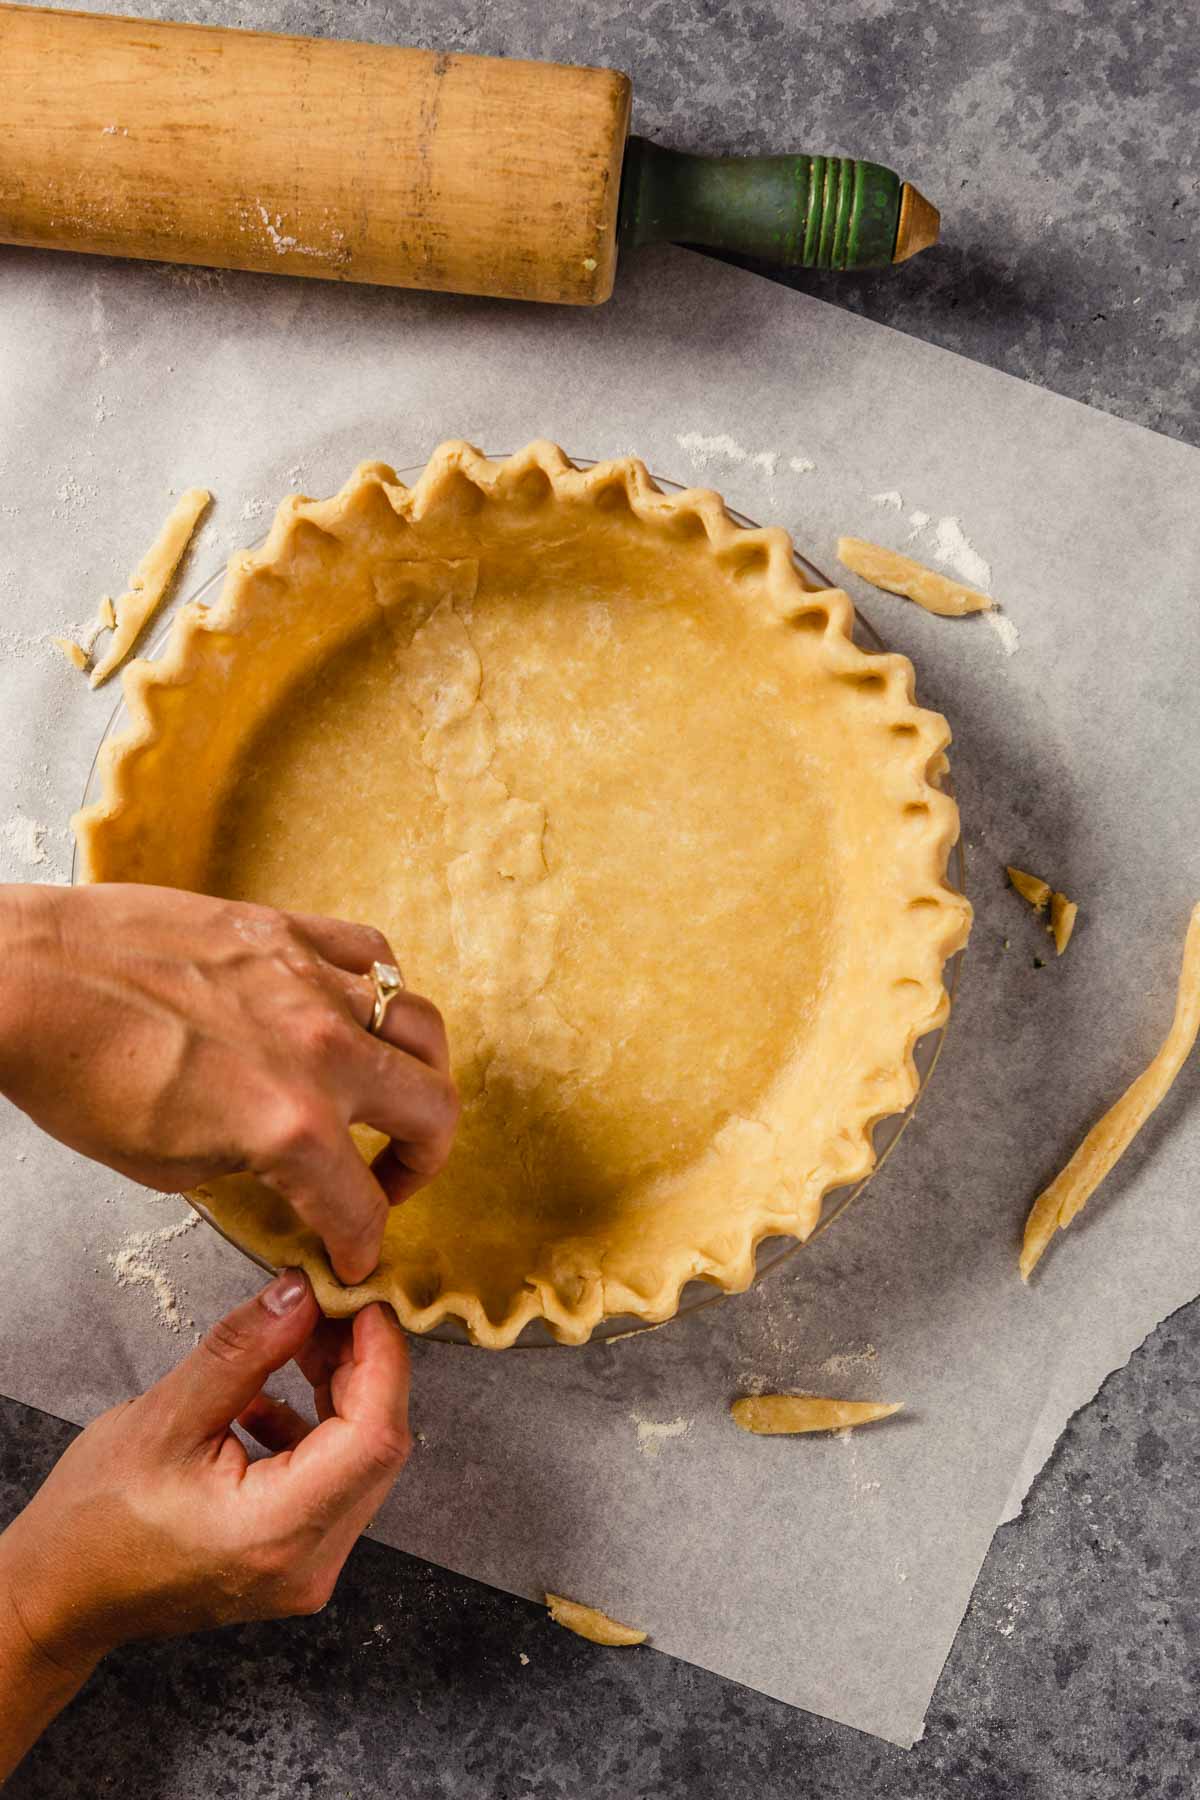
Gently roll the dough out into a 1/4-inch thick round using a lightly floured rolling pin. Transfer the dough to the pie plate by gently rolling the dough around the rolling pin then unrolling it over the pie plate. If the dough feels pretty strong, you can fold the dough in half, then in half again to form a triangle. Transfer the dough to the pie plate and unfold.
Test Kitchen Tips
- Keep ingredients cold. It’s important to keep everything as cold as possible so the butter and shortening “dot” the dough instead of melting into it and creating a homogenous dough.
- Don’t overwork the dough. When you see pea-sized crumbles, stop pulsing! At this point the fat is evenly dispersed but you haven’t worked the dough too much and formed a lot of gluten.
- Roll out 1-inch larger than pie plate. You want the rolled out dough to be slightly larger than your plate to account for lining the sides of the plate, not just the bottom of the plate. Plus, you want a bit of overhang to then fold under and crimp.
- Chill the assembled pie before baking. It’s important to chill the dough-lined plate (for blind baking) or assembled pie prior to baking. Chilling the dough-lined pie plate allows the dough to relax which will keep it from shrinking in on itself during baking, and it firms up the fat, which will lead to a flakier crust.
Make Ahead and Storage
After the dough comes together in the food processor, form into a 1-inch thick flat disc. Wrap the disc tightly in plastic wrap and store in the fridge for up to 3 days.
You can also freeze the pie crust. Place in the in the freezer for up to 3 months. When you are ready to use the frozen pie dough, allow it to thaw overnight in the refrigerator before using.
FAQ
To create a flaky pie crust I recommend you chill both the butter and shortening. Chilled butter and shortening will break apart into small pieces that will melt when baked and create flaky layers.
Using room temperature butter and shortening will fully incorporate the fat into the dry ingredients, resulting in a cracker-like crust.
Whole-wheat flour is surprisingly ideal for pie dough, it develops less gluten in the cooking process than all-purpose flour. Gluten formation is undesirable in pie crust because it will make it tough. Try subbing out ⅓ of the total amount of flour for whole-wheat flour to create a deliciously tender and flaky crust.
Some recipes will call for bubbly water or vodka in their recipe because they evaporate quicker than water. Quicker evaporation means less gluten development. And less gluten development means a tender—not tough—pie crust.
Try subbing using 2–4 tablespoons of club soda or vodka for water. Don’t worry about the pie tasting like vodka, the flavor (and alcohol content) will evaporate out during baking.
The standard food processor blade is best for making pie crust. No need for a special attachment.
Using the food processor definitely helps make a consistency and delicious pie crust every single time. Be sure not to overwork the pie dough in the food processor, this can lead to tough and chewy pastry.
Roll the crust 1-inch larger than the pie plate. This ensures that you have enough space to fill the pie plate completely and crimp the edges.
Let the dough sit out for 5–10 minutes until it’s still firm and cold but can roll without cracking. The dough shouldn’t be too hard or too soft, right in between.
More Easy Pie Recipes
- Our Blueberry Crumble Pie is packed with both flavor and texture.
- Pumpkin Pop Tarts are a fun way to use pie dough.
- Rhubarb Blueberry Pie is the perfect sweet-tart treat.
- A whole-wheat pie crust is delicious for a more nutty flavor. Light, tender and buttery. It’s also a great alternative to this recipe if you’re looking for an all-butter crust.
- We’ve also got a great gluten-free pie crust.
Flaky Food Processor Pie Crust
Description
Ingredients
- 1 ¼ cups (150g) all-purpose flour
- 1 tablespoon sugar
- ½ teaspoon kosher salt
- ¼ cup vegetable shortening, cut into ¼ inch pieces, chilled
- 6 tablespoons unsalted butter, cut in ¼ inch pieces, chilled
- 4 tablespoons ice water
Instructions
- In bowl of a food processor, combine flour, sugar, and salt; pulse to combine.
- Sprinkle shortening over flour mixture and process until flour resembles course cornmeal, about 5 pulses. Sprinkle butter over flour mixture and pulse until crumbs are slightly smaller than pea-sized, 15–20 pulses.
- Transfer dough mixture to a large bowl and sprinkle 3 tablespoons of ice water over dough.
- Using a rubber spatula, mix water into dough, pressing the dough together. If the dough doesn’t come together add remaining tablespoon of ice water and mix until dough is cohesive.
- Turn dough out onto a clean, flat surface, flatten into a 4-inch disk and wrap with plastic wrap; transfer to refrigerator and chill 1 hour.
- Remove dough from refrigerator and let stand at room temperature for 10 minutes before rolling out using a rolling pin. Use to make desired pie or galette.
Equipment
Notes
Nutrition
This recipe and article was originally published on November 1, 2014. It was most recently updated on December 15, 2021.


I needed a fullproof pastry crust recipe I could make in my food processor. Thank you for this one! It’s great
Hi Andrea, so glad you have enjoyed it!